Operating a marine engine in your boat is a little different than a car. A boat engine uses seawater to cool itself, whereas a car uses coolant and the air passing over the radiator. It sounds like a minor difference, but it means there are some extra steps in running a boat motor.
For one thing, you must understand that water flow is a vital component to the engine running. If the water stops, the engine will overheat and could be severely damaged.
Every time you start a boat engine, you should ensure that water is flowing through the system and that its water pump is working well. If you do your own work, you might also want to learn how to check the water pump on an outboard motor.
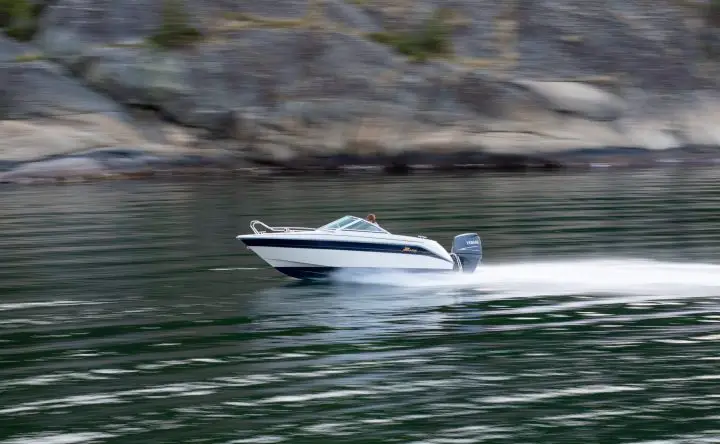
Table of Contents
- Let’s Prime the Pump – All About Marine Engine Water Pumps
- Top Signs of a Bad Water Pump
- How to Check Water Pump on Outboard Motor
- Solving Bad Outboard Water Pump Issues
- Outboard Water Pump FAQs
Let’s Prime the Pump – All About Marine Engine Water Pumps
Pretty much all marine engines use some form of raw or seawater cooling. Water is drawn from underwater by a water pump to accomplish this. It then circulates through the engine, or a heat exchanger, before being pumped overboard.
This is a good system because raw water is plentiful when on a boat. But there are certainly some downsides. For one thing, it means that you’re always drawing water through the engine. If it’s saltwater, that can cause corrosion. It also means that you risk clogging the pump if the water isn’t clean.
Water Pump Impeller
A water pump is a pretty simple item. They are nearly always engine driven, meaning that if the engine is spinning, so is the pump. The part of the pump that does the work and pulls the water through the system is called the impeller. It is a rubber paddlewheel-looking thing.
The impeller is not an indestructible part. Through disuse, the impeller will get deformed and brittle. No matter whether you use your engine a lot or a little, impellers will degrade with age. Impellers can also be damaged by dirty water (think sand and mud). So to make a long story short—impellers fail, and you should know to keep an eye on the condition of yours. A bad impeller might still pump cold water, but the flow will be greatly reduced.
Outboard Water Pumps
Outboards use raw water only for cooling—there is no other coolant or heat exchanger in the engine. Raw water is pumped up from the motor’s lower unit and through the cylinder block to regulate the motor temperature.
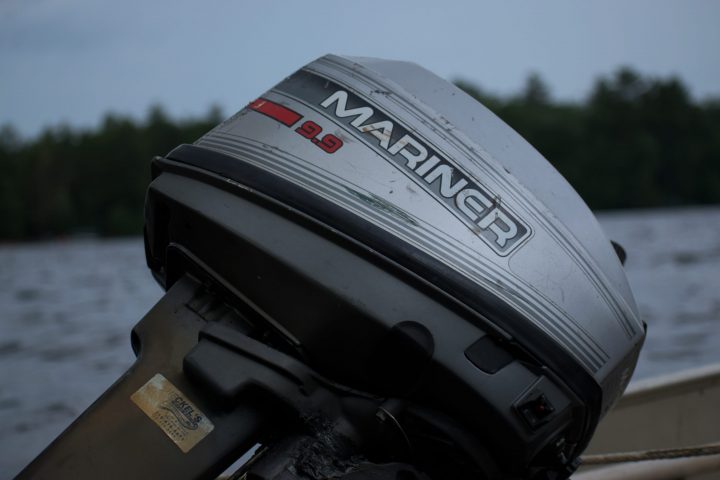
The water pump itself is located on the top of the lower unit. The only way to access it is to get the boat out of the water and remove the bottom of the drive leg. It sounds more complex than it is, and changing a water pump takes about an hour.
The water exits through a tell-tale. This is a small hole on the side of the engine that emits a steady stream of water. This enables the operator to see how well the water pump is performing. Less water than usual means a potential problem is developing. No water means there is a problem.
It’s worth noting that problems with outboards aren’t always caused by broken impeller blades or other raw water pump problems. The intakes on the lower gear case assembly can be covered by things like seaweed or plastic. Also, the tiny cooling water outlet can get clogged. Before diving too deep into a full-on water pump service, take a thin wire and ensure the hole is open.
Many newer outboards also have a connection for a garden hose. It’s a good idea to flush the engine regularly using this method since the water pressure from the hose can help get grime out of the cooling passages.
Inboard Engine Water Pumps
Most inboard engines have a slightly more advanced system. Basically, they have two cooling circuits, one with coolant and one with raw water. Raw water is pumped from outside the boat and through a heat exchanger. This heat exchanger takes heat from the hot engine coolant and puts it into the cool seawater.
The hot raw water is then used to reduce exhaust gas temperatures as it is discharged overboard. The result is that these engines don’t have a tell-tale like outboards but instead have a distinctive wet exhaust spray.
The amount of water discharged with the exhaust performs the same purpose as the tell-tale. If the flow is reduced, a problem might be developing. If there is no water in the exhaust, a problem has already happened.
Inboard systems are a little more complex than outboards because water comes through the boat’s hull and must go through an engine strainer. The water pump is on the accessory side of the engine, usually belt-driven but sometimes direct drive.
Thankfully, the water pump impeller is very easy to change on an inboard motor. You usually only need to remove a few screws from an access plate and pull the old rubber impeller out. Then, you just pop and the new one on.
Top Signs of a Bad Water Pump
Wondering how to tell if the water pump is bad on an outboard? Here is a list of the top signs the pump might need attention.
• Low flow from tell-tale (overboard discharge)
• Water temperature or pressure gauge readings
• Water temp warning lights or buzzers when running
• Partial or total loss of power when running
Low Flow from Overboard Discharge
Cooling water flow through the engine is such a critical thing that checking for water flow at the tell-tale should be part of your routine running procedures. Every time you start any marine engine, check for cooling water discharge immediately. Always making a point to look at it will give you a good idea of what normal flow looks like for your engine. That will help you notice any changes, which will clue you in when your pump starts to act up.
Mechanics often call the cooling water outlet on an outboard the “pisser” because that’s precisely what good water flow looks like. It’s a simple system, but it’s critical because there really isn’t any other outboard motor water pump test. So if the tell tale isn’t pissing, that’s an indication of the outboard not pumping water.
Where should water come out on an outboard motor? It depends on the make and model of the outboard, but generally, the telltale hole is below the block a few feet above the waterline. Most motors will let you adjust the direction of the water stream. Some people aim them down, while others like them going sideways, so they are easy to see from the helm.
An inboard boat motor works on the same principle, except instead of a tell tale, the water discharge is mixed with the exhaust gases.
Gauge Readings
This tip doesn’t apply to all motors—but it should. Cooling water is a critical component of a healthy engine, so carefully monitoring the cooling circuit is a good idea. Larger engines will usually have a temperature gauge so that you can monitor the temperature of the coolant or seawater. Unfortunately, many smaller motors or motors with simple control panels might not have this.
Water temperature and water pressure gauges are only as good as the operator, however. To be of any use, you’ll need to know the normal range for your engine. That’s the only way you’ll know when it’s high because most boat gauges are generic and not marked with a red line. And finally, the best gauge in the world won’t do any good if you never look at it. If the motor temperature starts to rise, it’s up to the operator to notice it.

Warning Lights or Buzzers
If your motor has an electric starter and an instrument cluster, the tachometer probably includes a few warning lights. One of these lights will be a high-temperature warning which should illuminate if the motor isn’t getting enough cooling water.
These are the most basic safety features that even older motors will have. It will at least have a buzzer that sounds when there is low oil pressure or high water temperatures. Unfortunately, because these buzzers are annoying and sound when the key is turned, some owners disconnect them. If you don’t hear a buzzer when you startup every time, check the wiring to ensure your warning system is working.
Related: Boat Key Replacement
Loss of Power when Running
Modern motors have computer-controlled governors to protect themselves, along with the warning lights. If the engine is overheating, it will likely apply a rev limiter to reduce engine speed. So if you notice a sudden and dramatic loss of power, the motor might be trying to tell you something. Check the panel for warnings and proceed carefully. Check the tell-tale for water discharge, and make sure everything is in order before pushing the engine again.
How to Check Water Pump on Outboard Motor
While you could leave your impeller alone until a complete water pump failure, prevention is far better than worrying about an overheated engine. In truth, no matter the water pump boat motor combo you have, the best thing to do is set up a maintenance schedule. Start with the engine manufacturer’s recommendations, and then check off items on the list.
If you’ve checked for blockages and think your outboard motor water pump not working is because it needs a new impeller, here is how to inspect it.
DIY or Take to the Shop?
The first step is to decide if the project is worth tackling on your own. If you’re handy, have tools, and have a space to work on the boat, changing the water pump should be an easy DIY job. It’s a little more complicated than changing your oil, but not much.
If you decide to dive in, it’s essential that you find a shop manual for your motor. This will tell you the sequence of parts to remove and the torques for the bolts. Remember, most of an outboard is made with aluminum parts that need to be torqued just right to prevent damage.
Order the Parts
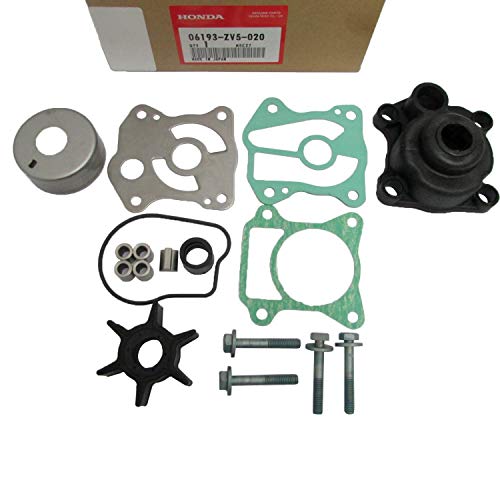
You’ll also want to research your motor carefully. For example, do they sell a rebuild kit for the water pump? Do you need to just replace the impeller, or is it a good idea to replace the housing as well?
If the motor is new to you, replacing the entire water pump might be a good idea. The house has metal plates that get worn down. If they are scratched and don’t allow the impeller to sit perfectly flush, it will lose efficiency.
If the housing is good, you can usually just replace the rubber impeller. Check the engine’s parts manual and make sure you get the exact right one.
Most people do their water pump service along with a more detailed annual inspection and servicing. At a minimum, you should also remove the prop to inspect the shaft and hub for any damage. It’s also a good idea to replace all of the engine’s sacrificial anodes with new ones. That’s another engine-specific part you should order from the parts manual.
All outboards have some anodes on the lower units. Some also have an anode or two inside the cooling circuit, usually on the block. Go ahead and replace these simultaneously to ensure they’re all in good shape for next season.
Get to Work
The precise procedure you follow for your water pump service will depend on the motor. Generally, the steps are as follows.
• Disconnect the gear shift coupler–check the manual for specifics on your engine
• Lift the motor up.
• Remove the prop nut, prop and prop spacer from the driveshaft
• Loosen and remove the bolts attaching the lower unit—there are usually six or more
• Carefully pull the lower unit off the motor—don’t force anything. The drive shaft and shift lever should come out and not be attached to anything
• Set the lower unit on a workbench
• Remove the housing bolts, water pump cover, water pump housing, and old impeller
• Clean all parts and inspect for any damage
• Place a new impeller
• Install cleaned housing or new assembly if you suspect you have a damaged pump housing
• Grease drive shaft, mating surfaces, and shift lever
• Reinstall lower unit on the motor
• Grease prop shaft and reinstall spacer, prop, and prop nut with cotter pin
• Reattach shift lever
Replacing an Inboard Propeller
While similar in theory, an inboard water pump is much easier to service. The water pump is usually located right on the front of the motor and is easy to access.
Start by ensuring that the through-hull is closed so that water will not enter the boat.
Remove the cover on the water pump. It is usually held on with six or more small screws.
Inside the cover, there might be an o-ring. If there is, inspect it and decide if you want to reuse it or not. If you have a spare, it is always best to replace it.
Pull the worn impeller out of the pump, being careful not to scratch the housing in the process. You usually have to wiggle it a bit to get it going. To help get the new one in, ensure that the key on the shaft is aligned and lubricate the impeller’s vanes with a bit of glycerin.
Solving Bad Outboard Water Pump Issues
If you want to keep your motor running for the long term, ensuring that it is cooling properly is one of your first orders of business. Check your owner’s manual and set up a schedule to check everything off the list. A little work now will save you a ton of headaches later.
For more boat troubleshooting:
Outboard Water Pump FAQs
How do you test an outboard water pump?
There’s no “test” for a water pump. Instead, you should keep your eye on the tell-tale, which is the overboard discharge. All outboards pump the water out through a small hole on the side, making it look like the motor is peeing. If the water flow starts to slow down or stop, you know something is blocking the water flow—or that your water pump might need servicing. So start by looking for apparent blockages. If you can’t find any, inspect the pump for damage and consider replacing the impeller.
Why isn’t my outboard pumping water?
Outboards will stop pumping water for only two reasons. Either something has blocked the water passages, or the water pump needs servicing. The first step is to make sure that nothing has blocked the intakes. Lift the motor out of the water and ensure there’s no plastic bag or other blockages over the lower unit.
If that’s not the problem, check the small telltale hole itself. Sometimes they get blocked with sand.
If those two things don’t provide an obvious solution, your water pump impeller likely needs to be replaced. On an outboard, this will mean getting the boat out of the water and dropping the lower unit off of the motor. Refer to your engine owners or shop manual for specifics.
When should I replace my outboard water pump?
Every engine manufacturer recommends replacing the water pump or the water pump impeller every so often. The only sure way to know how often you should replace yours is to look it up in the owner’s manual for your engine. The impeller should be inspected annually as a general rule of thumb. In reality, once you’ve done the work to inspect it, putting in a brand new $12 rubber part makes a lot of sense.